前言
大多數由 AI 驅動的客服聊天機器人,都難以在不同對話工作階段之間記住先前的內容,使用者只好一再重複自己說過的話,客服成本也因此節節高升,通常每張工單要花上 $15–25。這會導致重複的上下文、多達 40% 的額外 token 用量、解決同一個問題得多花三倍的訊息量,以及使用者整體上的挫折感。連續性是關鍵:沒有記憶,客戶體驗的效率就會變差,滿意度也隨之下滑。
在這篇教學中,你會學到如何打造一個具備持久對話記憶的客服 AI 代理(agent)——由 DigitalOcean Gradient™ AI 與 Memori SDK 提供支援。透過在數天甚至數週之間記住上下文,你的代理(agent)能減少 40–60% 的 token 成本,並以一半的訊息量解決問題。我們會示範如何用 FastAPI、PostgreSQL 與一個可嵌入的 JavaScript widget 來部署這個具備記憶的代理(agent),讓它能輕鬆整合進你的技術堆疊。
整個過程大約需要 25–30 分鐘,適合中階使用者,每月成本約在 $10–20 之間。你可以在 GitHub 上找到完整原始碼。
重點整理
在深入實作之前,先看看你會學到哪些內容:
- 對話記憶能減少 40-60% 的 token 成本,做法是把對話歷史壓縮成摘要,而不是把完整的訊息往返都送出去。
- 持久記憶能提升客服 AI 的表現,透過情境感知,滿意度提高 40%、解決時間縮短 50%。
- 多租戶架構(Multi-tenant) 讓每個網域各自隔離,兼顧隱私與 GDPR 合規,很適合 SaaS 部署情境。
- DigitalOcean Gradient AI 提供部署具備對話記憶之 AI 代理(agent)所需的基礎設施,而 Memori SDK 則負責智慧化的記憶壓縮。
- 可上線的技術堆疊結合了 FastAPI、PostgreSQL、Docker 與一個可嵌入的 JavaScript widget,方便整合。
- 跨工作階段的對話記憶讓客服 AI 代理(agent)能在數天或數週之間記住對話內容,使用者不必再重述前情。
你會打造出什麼
在這篇教學的最後,你會擁有一套完整的 AI 客服系統,包含:
- FastAPI 後端 —— 搭配 PostgreSQL 資料庫、支援多租戶的 REST API
- DigitalOcean 上的 AI 代理(agent) —— 使用 Gradient™ AI Platform 部署的 Gradient AI 代理(agent)(Llama-3.2-3B-Instruct 模型)
- 持久記憶 —— 整合 Memori SDK,能跨工作階段記住對話內容
- 可嵌入的 widget —— 只要一行程式碼就能加到任何網站上的 JavaScript widget
- 選用的知識庫 —— 上傳 PDF、文件與 URL,取得特定領域的答案
架構: 一套支援多租戶、可用於 SaaS 的系統,各網域彼此隔離,確保隱私與 GDPR 合規。
示範影片:實際看看 AI 代理(agent)的記憶
以下是這個具備持久記憶之客服 AI 代理(agent)的快速示範。看看下面這支影片,了解它如何跨工作階段記住使用者對話,並有效率地處理客服請求:
提示: 如果上方的預覽無法載入,請點這裡在 Google Drive 上觀看示範。
事前準備
必要條件:
- 具備 Gradient AI 存取權限的 DigitalOcean 帳號。如果你剛接觸 Gradient,可以參考我們的 Getting Started with the Gradient Platform 教學
- DigitalOcean API Token(在此取得)—— 格式為
dop_v1_... - DigitalOcean Project ID —— 格式為
aaaaaaaa-xxxx-xxxx-xxxx-xxxxxxxxxxxx,可在 DigitalOcean Cloud Panel 的網址中找到(在此查詢) - Docker 與 Docker Compose v2.0+
- Git
選用條件:
- PostgreSQL 用戶端(psql、pgAdmin、DBeaver)
- 網域名稱(測試時用 localhost 即可)
為什麼記憶很重要:數字會說話
節省 token 成本
以每 1K token $0.002 的典型定價來算,記憶能減少 40-60% 的成本:
| User Base | Annual Cost Without Memory | Annual Cost With Memory | Annual Savings |
|---|---|---|---|
| 10K users | $1,920 | $1,152 | $768 |
| 50K users | $9,600 | $5,760 | $3,840 |
| 100K users | $19,200 | $11,520 | $7,680 |
| 1M users | $192,000 | $115,200 | $76,800 |
假設條件: 每位使用者每月 2 次對話,每次對話 10 組訊息往返。
關鍵效能指標
| Metric | Without Memory | With Memory | Improvement |
|---|---|---|---|
| Messages to Resolution | 12-15 | 5-7 | 50% fewer |
| Customer Satisfaction | 3.2/5.0 | 4.5/5.0 | +40% |
| Human Escalation Rate | 25% | 10% | 60% reduction |
| First Contact Resolution | 42% | 68% | +62% |
快速 ROI 範例
以一套 50K 使用者的部署來算:
- 節省 token: 每年約 $4K
- 減少轉真人: 每年約 $2.7M
- 提升留存: 每年約 $750K
- 回本時間: 第一個月內
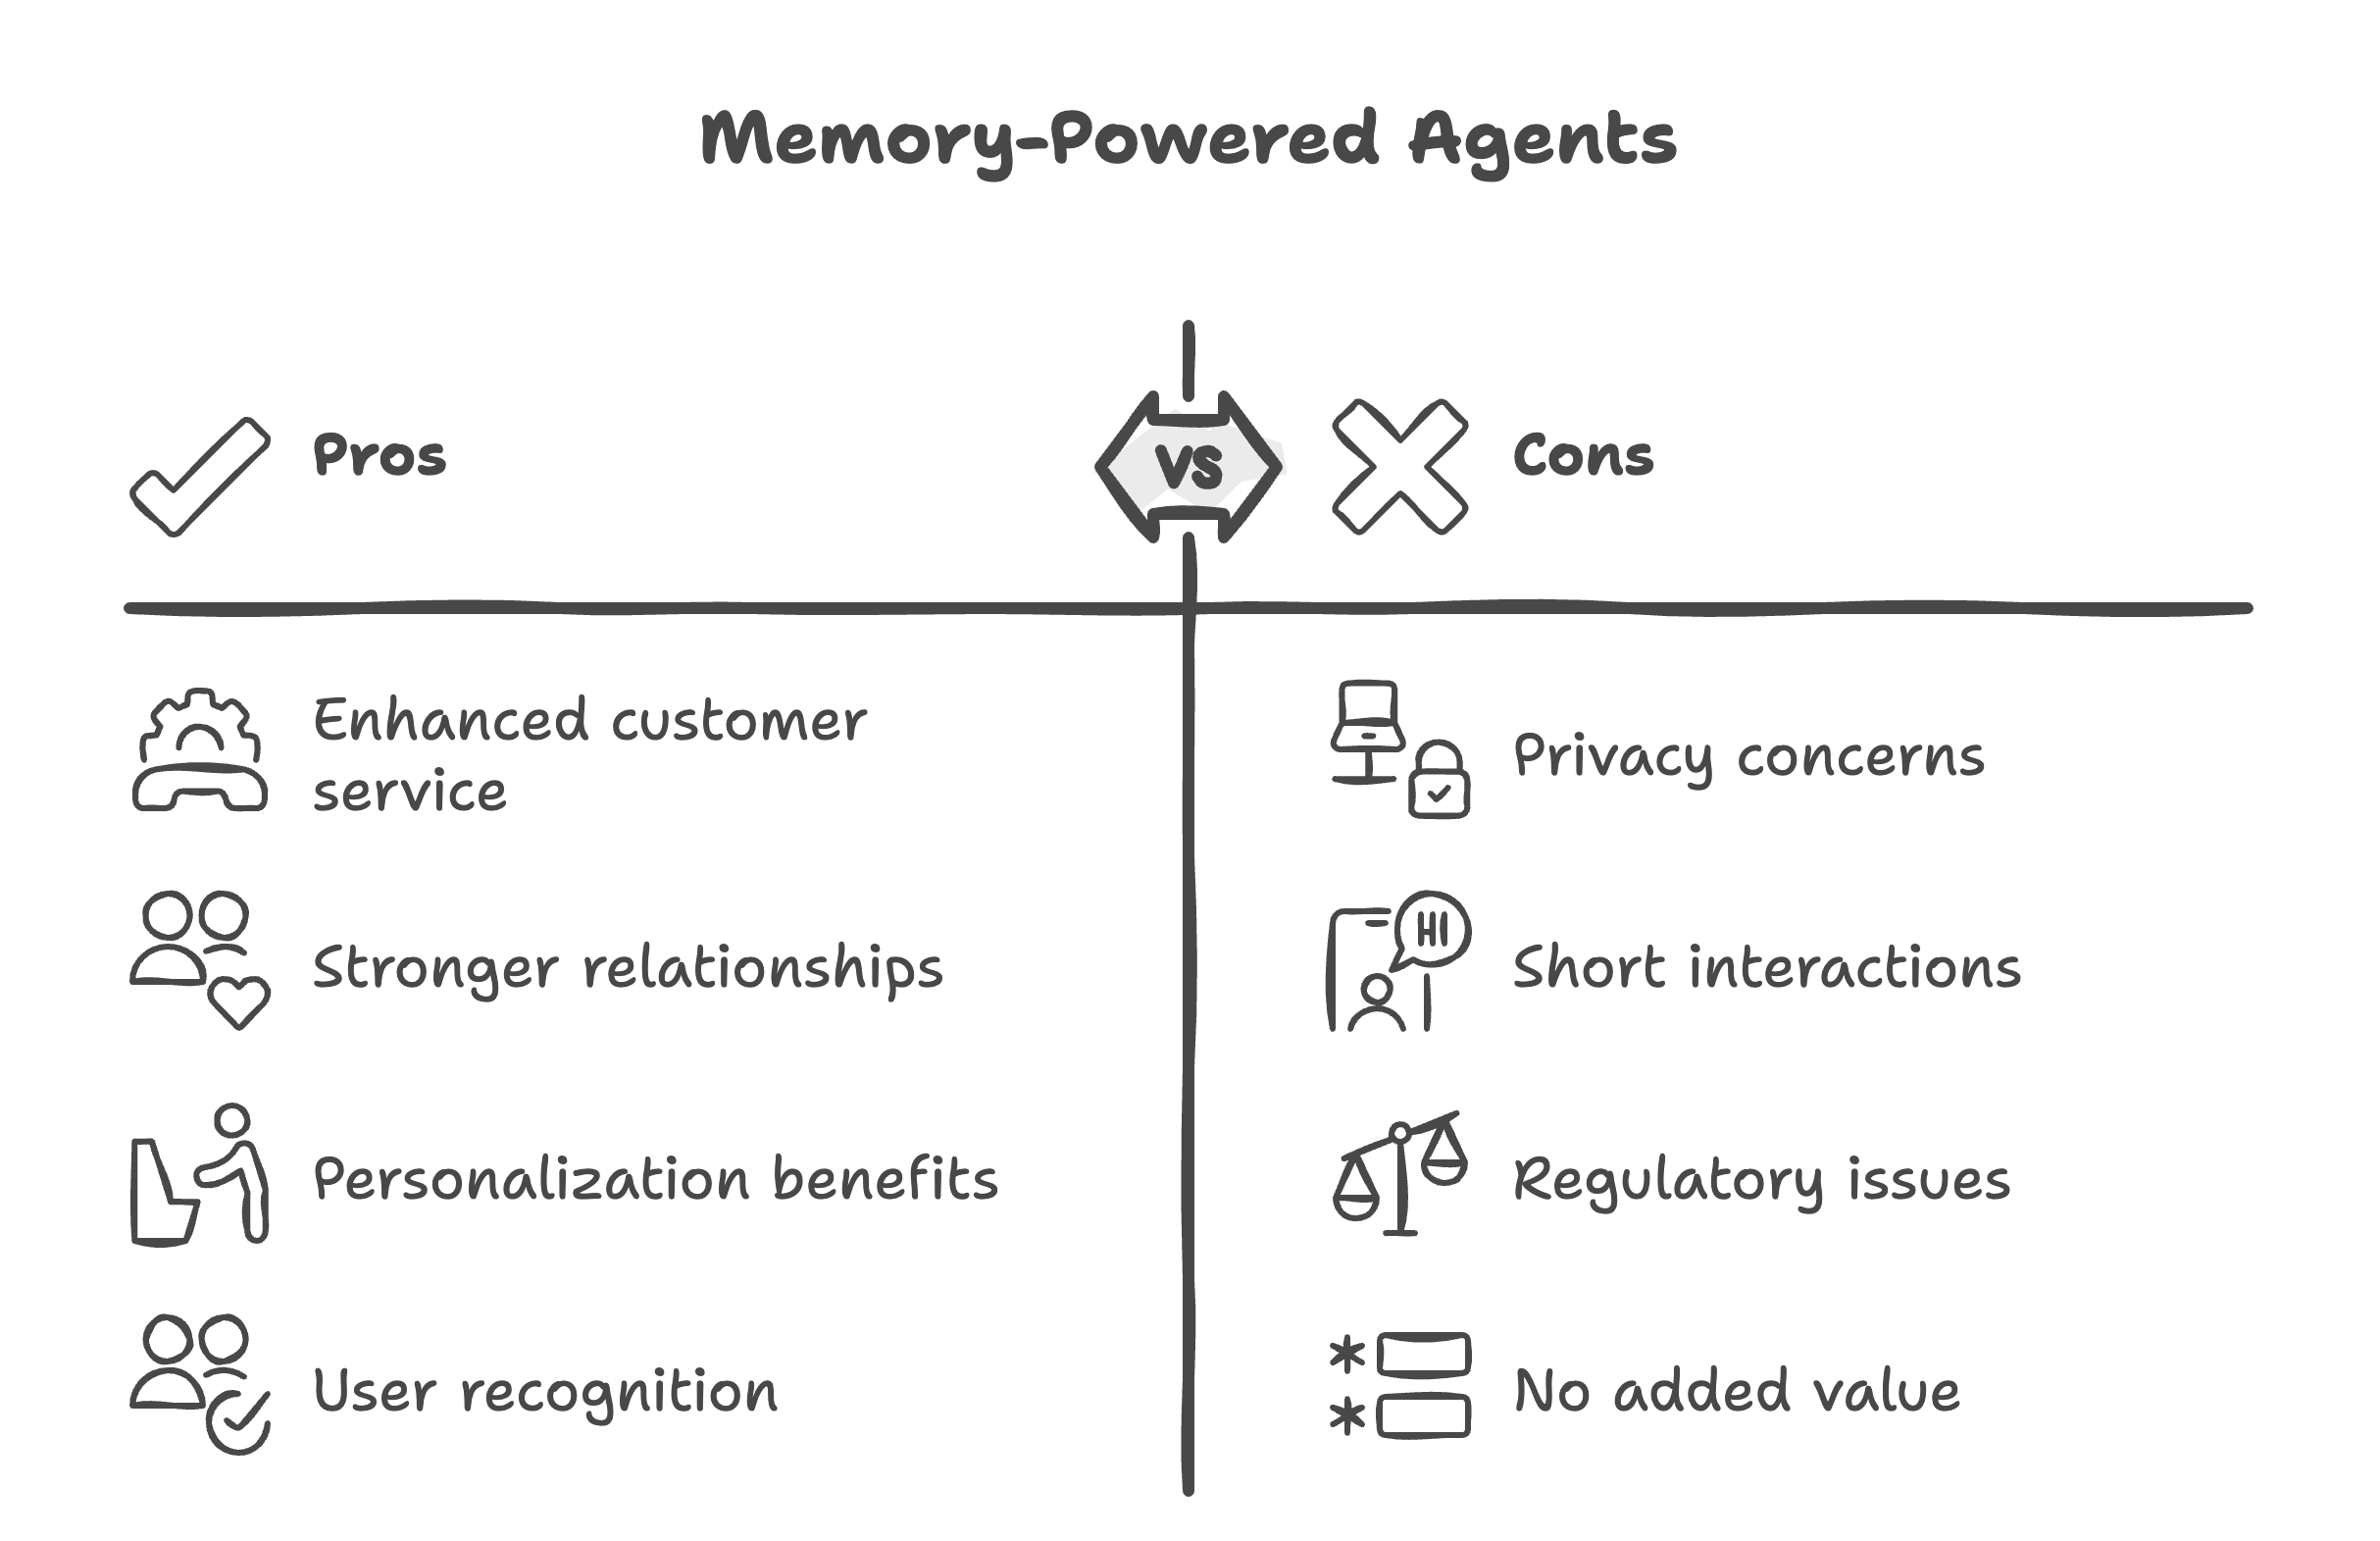
何時該用具備記憶的代理(agent)
適合使用具備記憶之代理(agent)的情境:
- 橫跨數天/數週的客戶服務
- 長期關係(銀行、醫療、教育)
- 個人化能帶來價值(推薦、加購)
- 使用者期待被認得(零售、餐旅)
應避免的情境:
- 對隱私敏感的情境(匿名求助專線)
- 短暫、一次性的互動(FAQ 查詢)
- 法規限制不允許保留資料
- 記憶無法帶來額外價值(靜態資訊查詢)
架構總覽
核心技術堆疊: FastAPI + PostgreSQL + DigitalOcean Gradient AI + Memori SDK(MemoriLabs OSS)
流程: 使用者 → Widget → 後端(取出記憶+查詢知識庫)→ AI → 儲存回應 → 使用者
各網域隔離: 每個網域都有各自隔離的記憶空間,確保隱私與 GDPR 合規。
資料如何流動:
當終端使用者與你的網站互動時,他們的訊息會經過幾個層級:
- 使用者在嵌入你網站的 widget 中輸入訊息。
- Widget 作為橋樑,把資料安全地送到你的後端伺服器。
- 後端(FastAPI)取出任何相關的對話記憶(透過 Memori SDK),並在需要時查詢知識庫以補充額外上下文。
- 請求被送往 AI 代理(agent)(運行於 DigitalOcean Gradient AI),它會依據當下的輸入以及取回的記憶/上下文產生回應。
- 後端儲存新的記憶,並把回應透過 widget 送回,呈現給使用者。
各網域隔離:
為了確保強而有力的隱私與合規(例如 GDPR),每個客戶網域(公司、組織或專案)都會獲得一個各自隔離的記憶空間。這代表對話歷史與知識庫絕不會在租戶之間共用,使用者只會收到基於自己組織資料與先前對話所產生的回應。
這套架構支援強健的安全性、有效率的成本管理,並能隨著你的使用者規模成長而輕鬆擴展。
記憶是怎麼運作的
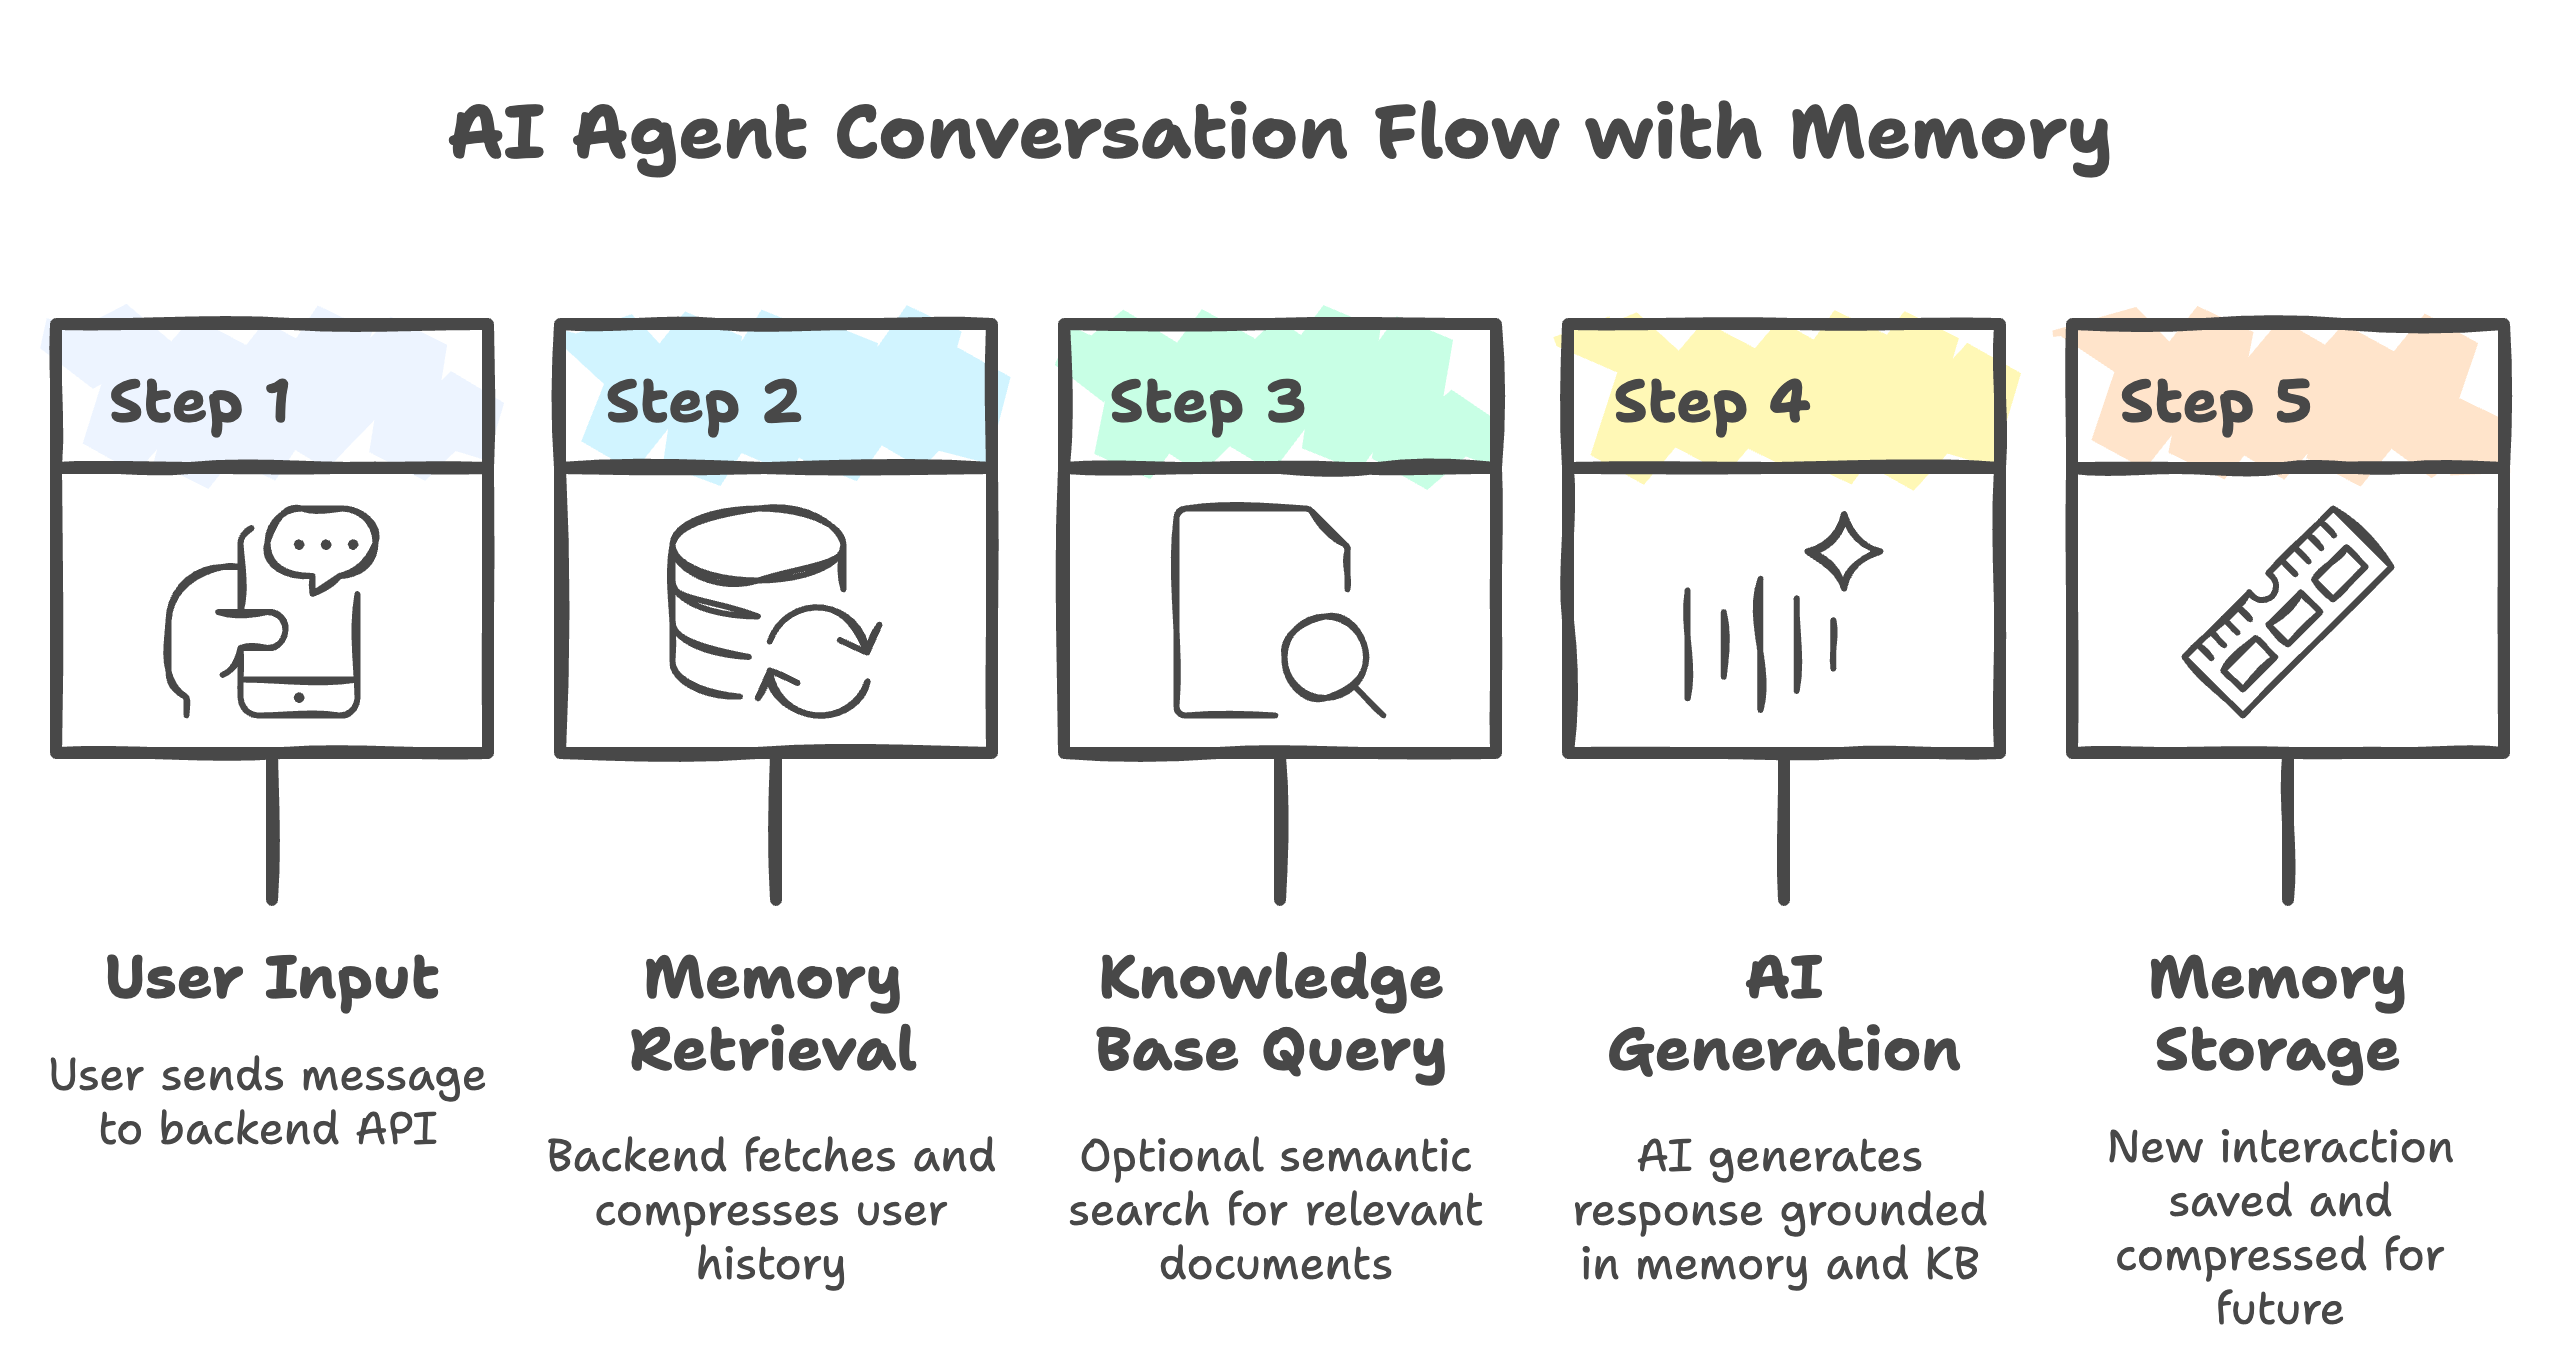
關鍵優點: Memori 不會把整段對話歷史送出去(那很貴),而是送出壓縮後的摘要(很便宜)。舉例來說:用「User Alice, order #12345, inquired about delivery」來取代 20 組訊息往返。正是這種對話記憶的做法,讓客服 AI 代理(agent)在大規模運作下仍具成本效益。
步驟 1:複製儲存庫並設定本機環境
首先,你需要一份專案的本機副本,以及一個存放環境變數的設定檔。
-
複製儲存庫:
這會把完整的專案程式碼下載到你的本機。git clone https://github.com/Boburmirzo/customer-support-agent-memory.git cd customer-support-agent-memorybash -
建立環境設定檔:
把範例環境檔複製成.env。這個檔案存放像是 API 金鑰與資料庫憑證等敏感資訊,你會在下一步自訂它。cp .env.example .envbash
現在你已準備好設定憑證,可以繼續進行後續設定。
設定環境變數
用你的憑證編輯 .env:
# DigitalOcean Configuration
DIGITALOCEAN_TOKEN=dop_v1_YOUR_TOKEN_HERE
DIGITALOCEAN_PROJECT_ID=YOUR_PROJECT_UUID_HERE

# AI Model Configuration
DIGITALOCEAN_AI_MODEL_ID=88515689-75c6-11ef-bf8f-4e013e2ddde4  # Llama-3.2-3B-Instruct
DIGITALOCEAN_EMBEDDING_MODEL_ID=22653204-79ed-11ef-bf8f-4e013e2ddde4  # text-embedding-3-small
DIGITALOCEAN_REGION=tor1

# Database Configuration (defaults work for Docker Compose)
POSTGRES_HOST=localhost
POSTGRES_PORT=5432
POSTGRES_DB=customer_support
POSTGRES_USER=do_user
POSTGRES_PASSWORD=do_user_password
DATABASE_URL=postgresql+psycopg://do_user:do_user_password@localhost:5432/customer_support
bash
注意: 預設的 AI 模型是 Llama-3.2-3B-Instruct(快速、具成本效益)。你可以在 DigitalOcean Gradient AI Console 找到其他模型的 ID。想了解更多打造 AI 代理(agent)的內容,可以參考我們的教學:building an AI agent or chatbot with Gradient Platform。
步驟 2:用 Docker Compose 啟動服務
這篇教學使用 Docker Compose 來協調 FastAPI 後端與 PostgreSQL 資料庫服務。
docker-compose up -d --build
bash
等待 30 秒讓容器初始化,然後進行驗證:
# Check services are running
docker-compose ps

# Expected output (container names and status):
# NAME                  COMMAND              STATE         PORTS
# customer_support_api  "uvicorn ..."        Up            0.0.0.0:8000->8000/tcp
# customer_support_db   "docker-entrypoint"  Up (healthy)  0.0.0.0:5432->5432/tcp

# Test API health
curl http://localhost:8000/health | jq
bash
兩個容器都應該顯示 Up 狀態。API 文件位於 http://localhost:8000/docs
# Check logs if something fails
docker-compose logs --tail=50 api
docker-compose logs --tail=50 postgres

# Common issues:
# - Missing .env variables
# - Port 8000 or 5432 already in use
# - Database not ready: wait longer and retry
bash
認識多租戶架構
在註冊你的網域之前,先了解這三個關鍵元件如何協同運作,會很有幫助:
三項服務
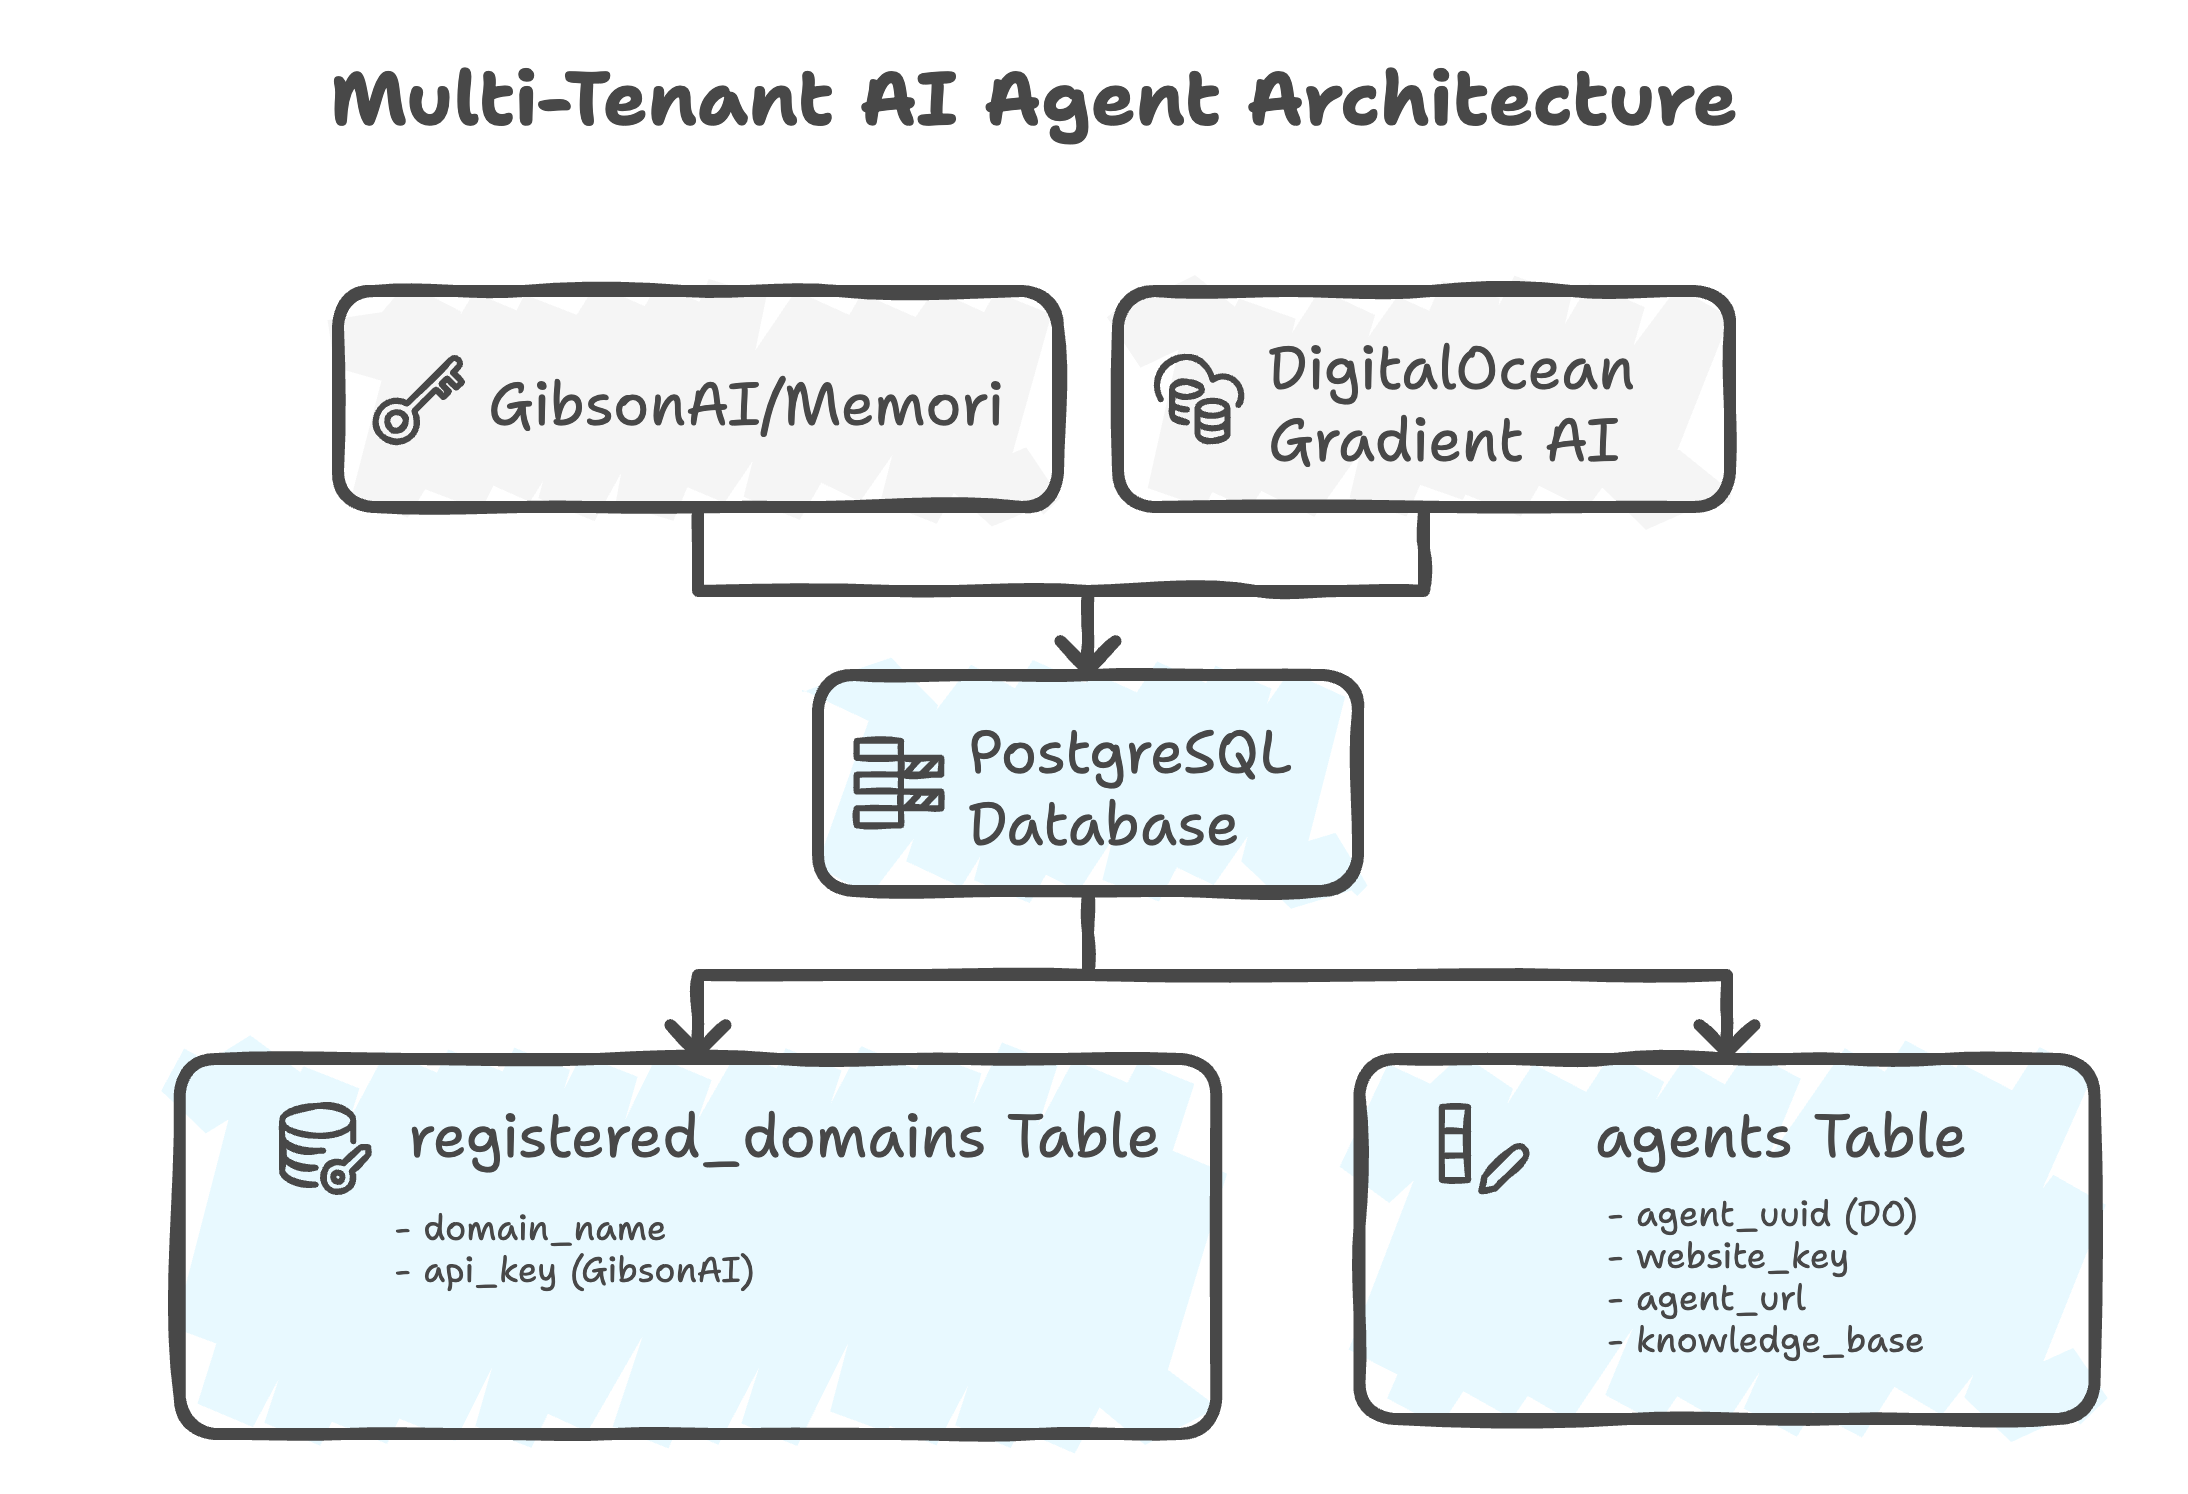
架構圖說明:
- 上層: 外部服務(負責 AI 處理的 DigitalOcean)
- 下層: 你本機的 PostgreSQL 資料庫,儲存網域設定與代理(agent)中繼資料
- 連線: 代理(agent)建立(DigitalOcean ↔ PostgreSQL)
各元件的職責
- 網域註冊(本機 PostgreSQL)
- 在你的本機資料庫中建立唯一的網域 ID
- 建立關聯:網域名稱 → 網域 ID → DO 代理(agent)
- 支援多租戶 SaaS 架構(每個客戶都有各自隔離的代理(agent))
- DigitalOcean Gradient AI 代理(agent)(
agent_uuid)- 實際處理對話的 AI
- 使用你在
.env中指定的模型(例如 Llama-3.2-3B-Instruct) - 部署於 DigitalOcean 雲端基礎設施上
- 可掛接知識庫
- Memori SDK(MemoriLabs OSS)
- 提供跨對話的持久記憶
- 為 AI 代理(agent)而生的開源記憶管理
- 直接整合進你的應用程式
建立的資料庫資料表
| Table | Purpose |
|---|---|
registered_domains | Maps domain names to unique domain IDs |
agents | Stores DigitalOcean agent details (UUID, URL, access keys) |
knowledge_bases | Tracks uploaded documents and their vector embeddings |
user_sessions | Manages active user chat sessions |
conversation_history | Stores all messages for memory retrieval |
步驟 3:註冊你的網域
註冊你的網域,取得供 API 請求使用的唯一網域 ID。
curl -X POST http://localhost:8000/register-domain \
  -H "Content-Type: application/json" \
  -d '{"domain_name": "www.example.com"}' | jq

bash
預期回應:
{
  "message": "Domain registered successfully",
  "domain_id": "1c6b2b83-xxxx-xxxx-xxxx-xxxxxxxxxxxx",
  "agent_created": true,
  "agent_uuid": "13129dad-xxxx-xxxx-xxxx-xxxxxxxxxxxx",
  "agent_deployment_status": "STATUS_WAITING_FOR_DEPLOYMENT",
  "deployment_message": "Agent created successfully. Deployment will complete in 1-2 minutes and you can start using it."
}
json
重要: 請保存好 domain_id,後續所有 API 請求都會用到它。
export DOMAIN_ID="1c6b2b83-xxxx-xxxx-xxxx-xxxxxxxxxxxx"  # Use your actual domain_id
bash
這個 ID 會用在工作階段(session)與聊天端點的 X-Domain-ID 標頭中。
等待 60-120 秒讓代理(agent)完成部署,然後檢查狀態:
curl -X GET "http://localhost:8000/agents" | jq
bash
準備就緒時的預期回應:
{
  "agents": [
    {
      "website_key": "c984d06a********",
      "agent_uuid": "13129dad-xxxx-xxxx-xxxx-xxxxxxxxxxxx",
      "website_url": "https://example.com",
      "agent_url": "https://yurhuqh*********.agents.do-ai.run",
      "has_access_key": true,
      "created_at": "2025-11-17T14:09:50.939987",
      "knowledge_base_uuids": ["1001f07b-xxxx-xxxx-xxxx-xxxxxxxxxxxx"]
    }
  ],
  "total": 1
}
json
確認 "has_access_key": true 以及一個有效的 agent_url,即代表代理(agent)已準備就緒。
步驟 4:測試聊天 API
工作階段內記憶測試
在這個測試中,我們會模擬一次客服互動,示範工作階段內的記憶:
- 第一則訊息: Alice 自我介紹,並提到訂單 #12345
- 後續追問: Alice 問「When will it arrive?」,但沒有重述自己的名字或訂單編號
- 預期結果: AI 記住第一則訊息的上下文,並做出恰當的回應
建立一個工作階段,測試這個具備記憶的聊天:
# Create session (uses DOMAIN_ID from Step 3)
curl -X POST http://localhost:8000/session \
  -H "Content-Type: application/json" \
  -H "X-Domain-ID: $DOMAIN_ID" \
  -d '{
    "user_id": "user_alice_123"
  }' | jq
bash
預期回應:
{
  "session_id": "87d12af1-xxxx-xxxx-xxxx-xxxxxxxxxxxx",
  "user_id": "user_alice_123",
  "created_at": "2025-11-17T15:16:45.689949",
  "website_url": null
}
json
保存 session_id:
export SESSION_ID="87d12af1-xxxx-xxxx-xxxx-xxxxxxxxxxxx"  # Use your actual session_id
bash
送出一則訊息(注意:要包含 user_id 才能啟用記憶):
curl -X POST http://localhost:8000/ask \
  -H "Content-Type: application/json" \
  -H "X-Domain-ID: $DOMAIN_ID" \
  -d "{
    \"session_id\": \"$SESSION_ID\",
    \"user_id\": \"user_alice_123\",
    \"question\": \"Hi, my name is Alice and I need help with order #12345\"
  }" | jq
bash
預期回應(因為 AI 模型推論的關係,可能需要 8-12 秒):
{
  "answer": "Hello Alice, it's nice to formally meet you. I can see that you're inquiring about order #12345. I'd be happy to assist you with that. Can you please tell me a bit more about what's going on with your order? Is there something specific you'd like to know or a problem you're experiencing?",
  "sources": [],
  "session_id": "87d12af1-xxxx-xxxx-xxxx-xxxxxxxxxxxx"
}
json
送出一則後續訊息來測試記憶:
curl -X POST http://localhost:8000/ask \
  -H "Content-Type: application/json" \
  -H "X-Domain-ID: $DOMAIN_ID" \
  -d "{
    \"session_id\": \"$SESSION_ID\",
    \"user_id\": \"user_alice_123\",
    \"question\": \"When will it arrive?\"
  }" | jq
bash
預期回應:
{
  "answer": "I understand you're looking for an update on your order #12345. As I mentioned earlier, I don't have the exact delivery date available. I recommend checking the order confirmation email or your account on the retailer's website for the latest shipping updates. This should give you a more accurate estimate of when you can expect your order to arrive. If you need further assistance or have any other questions, feel free to ask!",
  "sources": [],
  "session_id": "87d12af1-xxxx-xxxx-xxxx-xxxxxxxxxxxx"
}
json
注意到 AI 記住了 Alice 的名字與訂單編號(#12345),這些都來自上一則訊息,使用者不必重述上下文。回應時間(8-12 秒)是因為 DigitalOcean Gradient AI 模型推論所致。
步驟 5:測試跨工作階段記憶
這個測試展現了持久記憶的核心價值。當使用者在數小時或數天後回來時,AI 會記得他們先前的對話——不必再重述上下文!
測試情境
模擬一位回訪的顧客(同一位使用者、不同的工作階段):
- 為 Alice建立新的工作階段(相同的
user_id) - 在不提供任何上下文的情況下詢問訂單
- 預期結果: AI 記得上一個工作階段的訂單 #12345,並帶著上下文回應
為同一位使用者建立一個新的工作階段,模擬他稍後回訪:
# Same user_id, new session (uses DOMAIN_ID from Step 3)
curl -X POST http://localhost:8000/session \
  -H "Content-Type: application/json" \
  -H "X-Domain-ID: $DOMAIN_ID" \
  -d '{
    "user_id": "user_alice_123"
  }' | jq
bash
預期回應:
{
  "session_id": "4820e62c-xxxx-xxxx-xxxx-xxxxxxxxxxxx",
  "user_id": "user_alice_123",
  "created_at": "2025-11-17T15:37:05.540265",
  "website_url": null
}
json
保存新的 session ID:
export SESSION_ID_NEW="4820e62c-xxxx-xxxx-xxxx-xxxxxxxxxxxx"  # Use your actual session_id
bash
使用者稍後回訪,在不重述上下文的情況下發問(相同的 user_id 便能啟用跨工作階段記憶):
curl -X POST http://localhost:8000/ask \
  -H "Content-Type: application/json" \
  -H "X-Domain-ID: $DOMAIN_ID" \
  -d "{
    \"session_id\": \"$SESSION_ID_NEW\",
    \"user_id\": \"user_alice_123\",
    \"question\": \"Has my order arrived yet?\"
  }" | jq
bash
預期回應(可能需要 10-15 秒):
{
  "answer": "I'd be happy to help you with your order status. Since you had previously ordered #12345, I recommend checking your email for updates on the delivery status. Sometimes, updates are sent directly to your inbox. If you're unable to find any information in your email, you can also check the order tracking information on our website. Would you like me to guide you on how to do that?",
  "sources": [],
  "session_id": "4820e62c-xxxx-xxxx-xxxx-xxxxxxxxxxxx"
}
json
AI 記住了上一個工作階段的訂單編號(#12345),使用者完全不必重述任何內容。這種跨工作階段記憶正是核心價值所在——使用者感覺被認得、被重視,而你也因為不必重述上下文而省下 token。
這種跨工作階段記憶正是核心價值所在——使用者感覺被認得、被重視,而你也因為不必重述上下文而省下 token。
步驟 6:把 widget 嵌入你的網站
把 widget 加到任何網站上。從以下方法中擇一:
方法 1:簡單的一行整合(建議)
<!-- Just add this single script tag -->
<script
  src="http://localhost:8000/static/widget.js"
  data-domain-id="YOUR_DOMAIN_ID_HERE"
></script>
html
Widget 會自動以 script 的來源(origin)作為 API URL。
方法 2:透過 JavaScript 初始化(更能掌控)
<script src="http://localhost:8000/static/widget.js"></script>
<script>
  CustomerSupportWidget.init({
    apiUrl: 'http://localhost:8000',
    domainId: 'YOUR_DOMAIN_ID_HERE', // From Step 3
    position: 'bottom-right',
    primaryColor: '#0066cc',
    welcomeMessage: 'Hi! How can I help you today?',
  });
</script>
html| Option | Type | Default | Description |
|---|---|---|---|
apiUrl | string | required | Your backend API URL |
domainId | string | required | Domain ID from Step 3 (UUID format) |
position | string | 'bottom-right' | Widget position: 'bottom-right', 'bottom-left' |
primaryColor | string | '#007bff' | Brand color for buttons and header |
welcomeMessage | string | 'Hi! How can I help you today?' | Initial greeting message |
placeholder | string | 'Type your message...' | Input field placeholder |
widgetTitle | string | 'Customer Support' | Widget header title |
autoScrape | boolean | true | Automatically scrape website for knowledge |
完整自訂的範例:
<script>
  CustomerSupportWidget.init({
    apiUrl: 'https://your-api.com',
    domainId: '1c6b2b83-xxxx-xxxx-xxxx-xxxxxxxxxxxx', // Your domain ID from Step 3
    position: 'bottom-left',
    primaryColor: '#FF5722',
    welcomeMessage: 'Welcome back! How can we help today?',
    placeholder: 'Ask me anything...',
    widgetTitle: 'Customer Support',
    autoScrape: false,
  });
</script>
html
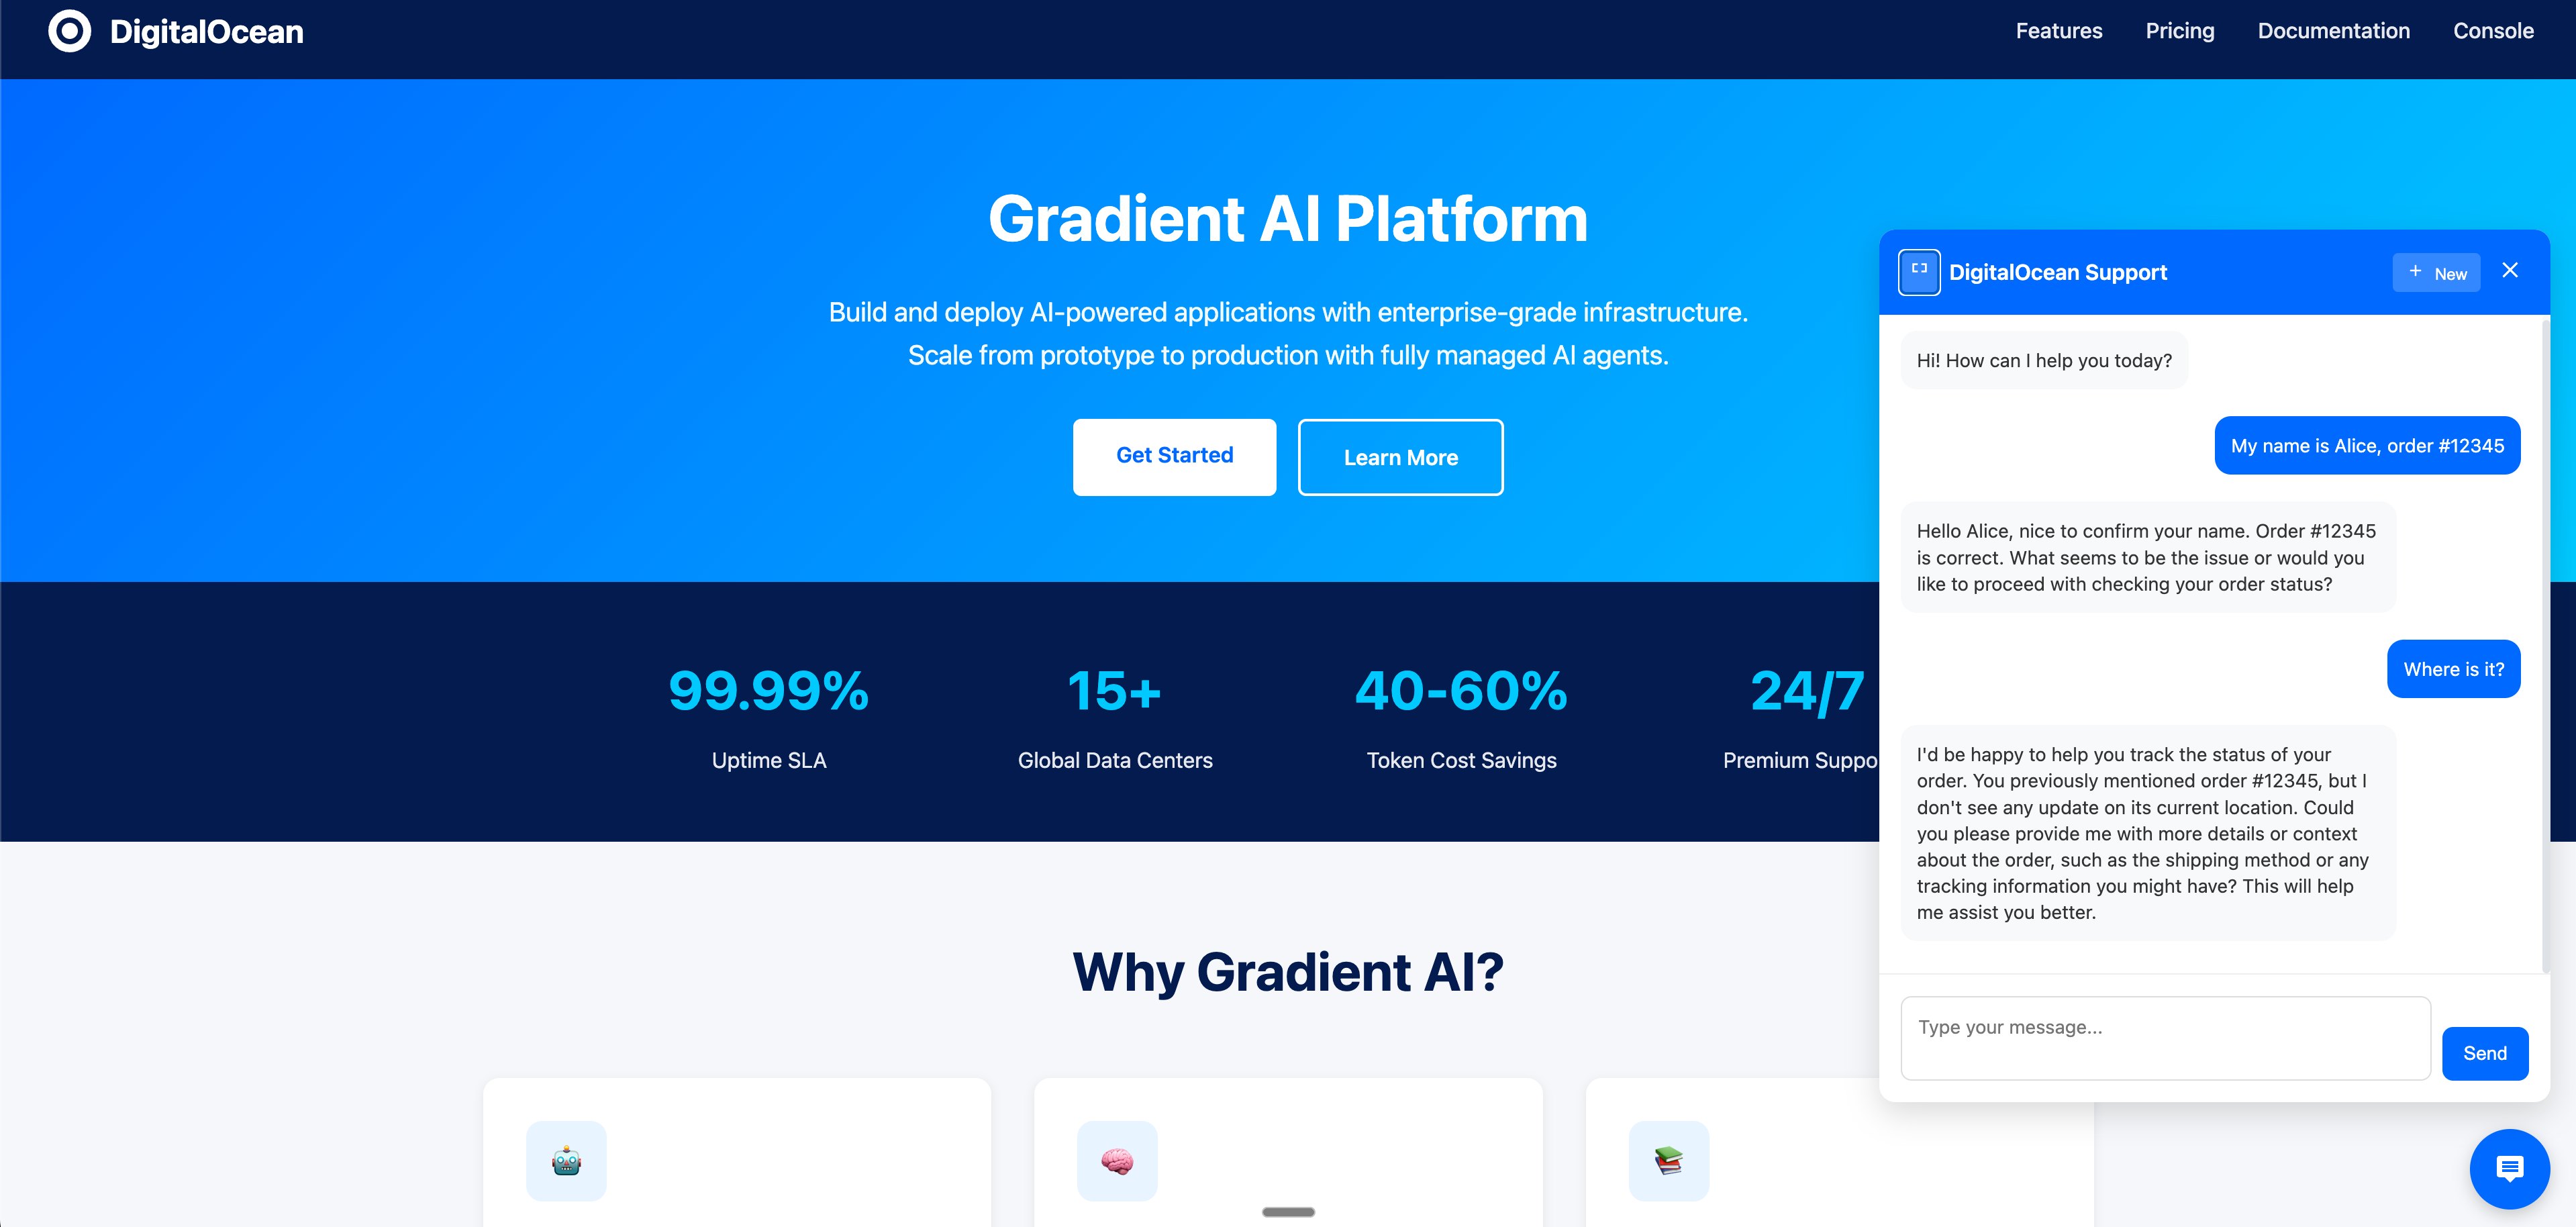
測試 widget
造訪示範頁面,實際看看 widget 的運作:
產品示範: http://localhost:8000/static/product_demo.html
Widget 會自動處理:
- 工作階段管理(保存在 localStorage 中)
- 跨頁面重新載入的對話記憶
- 為回訪使用者提供的持久記憶(透過 user_id)
- 兼顧行動裝置與桌機的響應式設計
步驟 7:上傳知識庫(選用)
何時該用這個:
- 你有產品文件、FAQ 或政策文件
- 你希望 AI 能回答關於特定公司資訊的問題
- 你需要根據你的文件產生有依據、準確的回應
用特定領域的知識強化你的代理(agent)。
選項 A:上傳檔案(PDF、TXT、MD、JSON、CSV)
# Upload a file (e.g., product manual, FAQ, policy document)
# Uses DOMAIN_ID from Step 3
curl -X POST http://localhost:8000/knowledge/upload/file \
  -H "X-Domain-ID: $DOMAIN_ID" \
  -F "file=@/path/to/your/document.pdf" | jq

# Expected response:
{
  "message": "File uploaded successfully",
  "filename": "product-manual.pdf",
  "file_type": "pdf",
  "chunks_created": 47,
  "kb_uuid": "1001f07b-c3bf-11f0-b074-4e013e2ddde4"
}
bash
選項 B:上傳純文字內容
# Upload text content directly
curl -X POST http://localhost:8000/knowledge/upload/text \
  -H "Content-Type: application/json" \
  -H "X-Domain-ID: $DOMAIN_ID" \
  -d '{
    "text": "Your FAQ or support content here...",
    "title": "Support FAQ"
  }' | jq
bash
選項 C:從 URL 上傳
curl -X POST http://localhost:8000/knowledge/upload/url \
  -H "Content-Type: application/json" \
  -H "X-Domain-ID: $DOMAIN_ID" \
  -d '{
    "url": "https://example.com/help/shipping-policy"
  }' | jq
bash
查詢支援的檔案類型
curl -X GET http://localhost:8000/knowledge/supported-types | jq
bash
驗證知識庫
curl -X GET http://localhost:8000/knowledge-bases | jq
bash
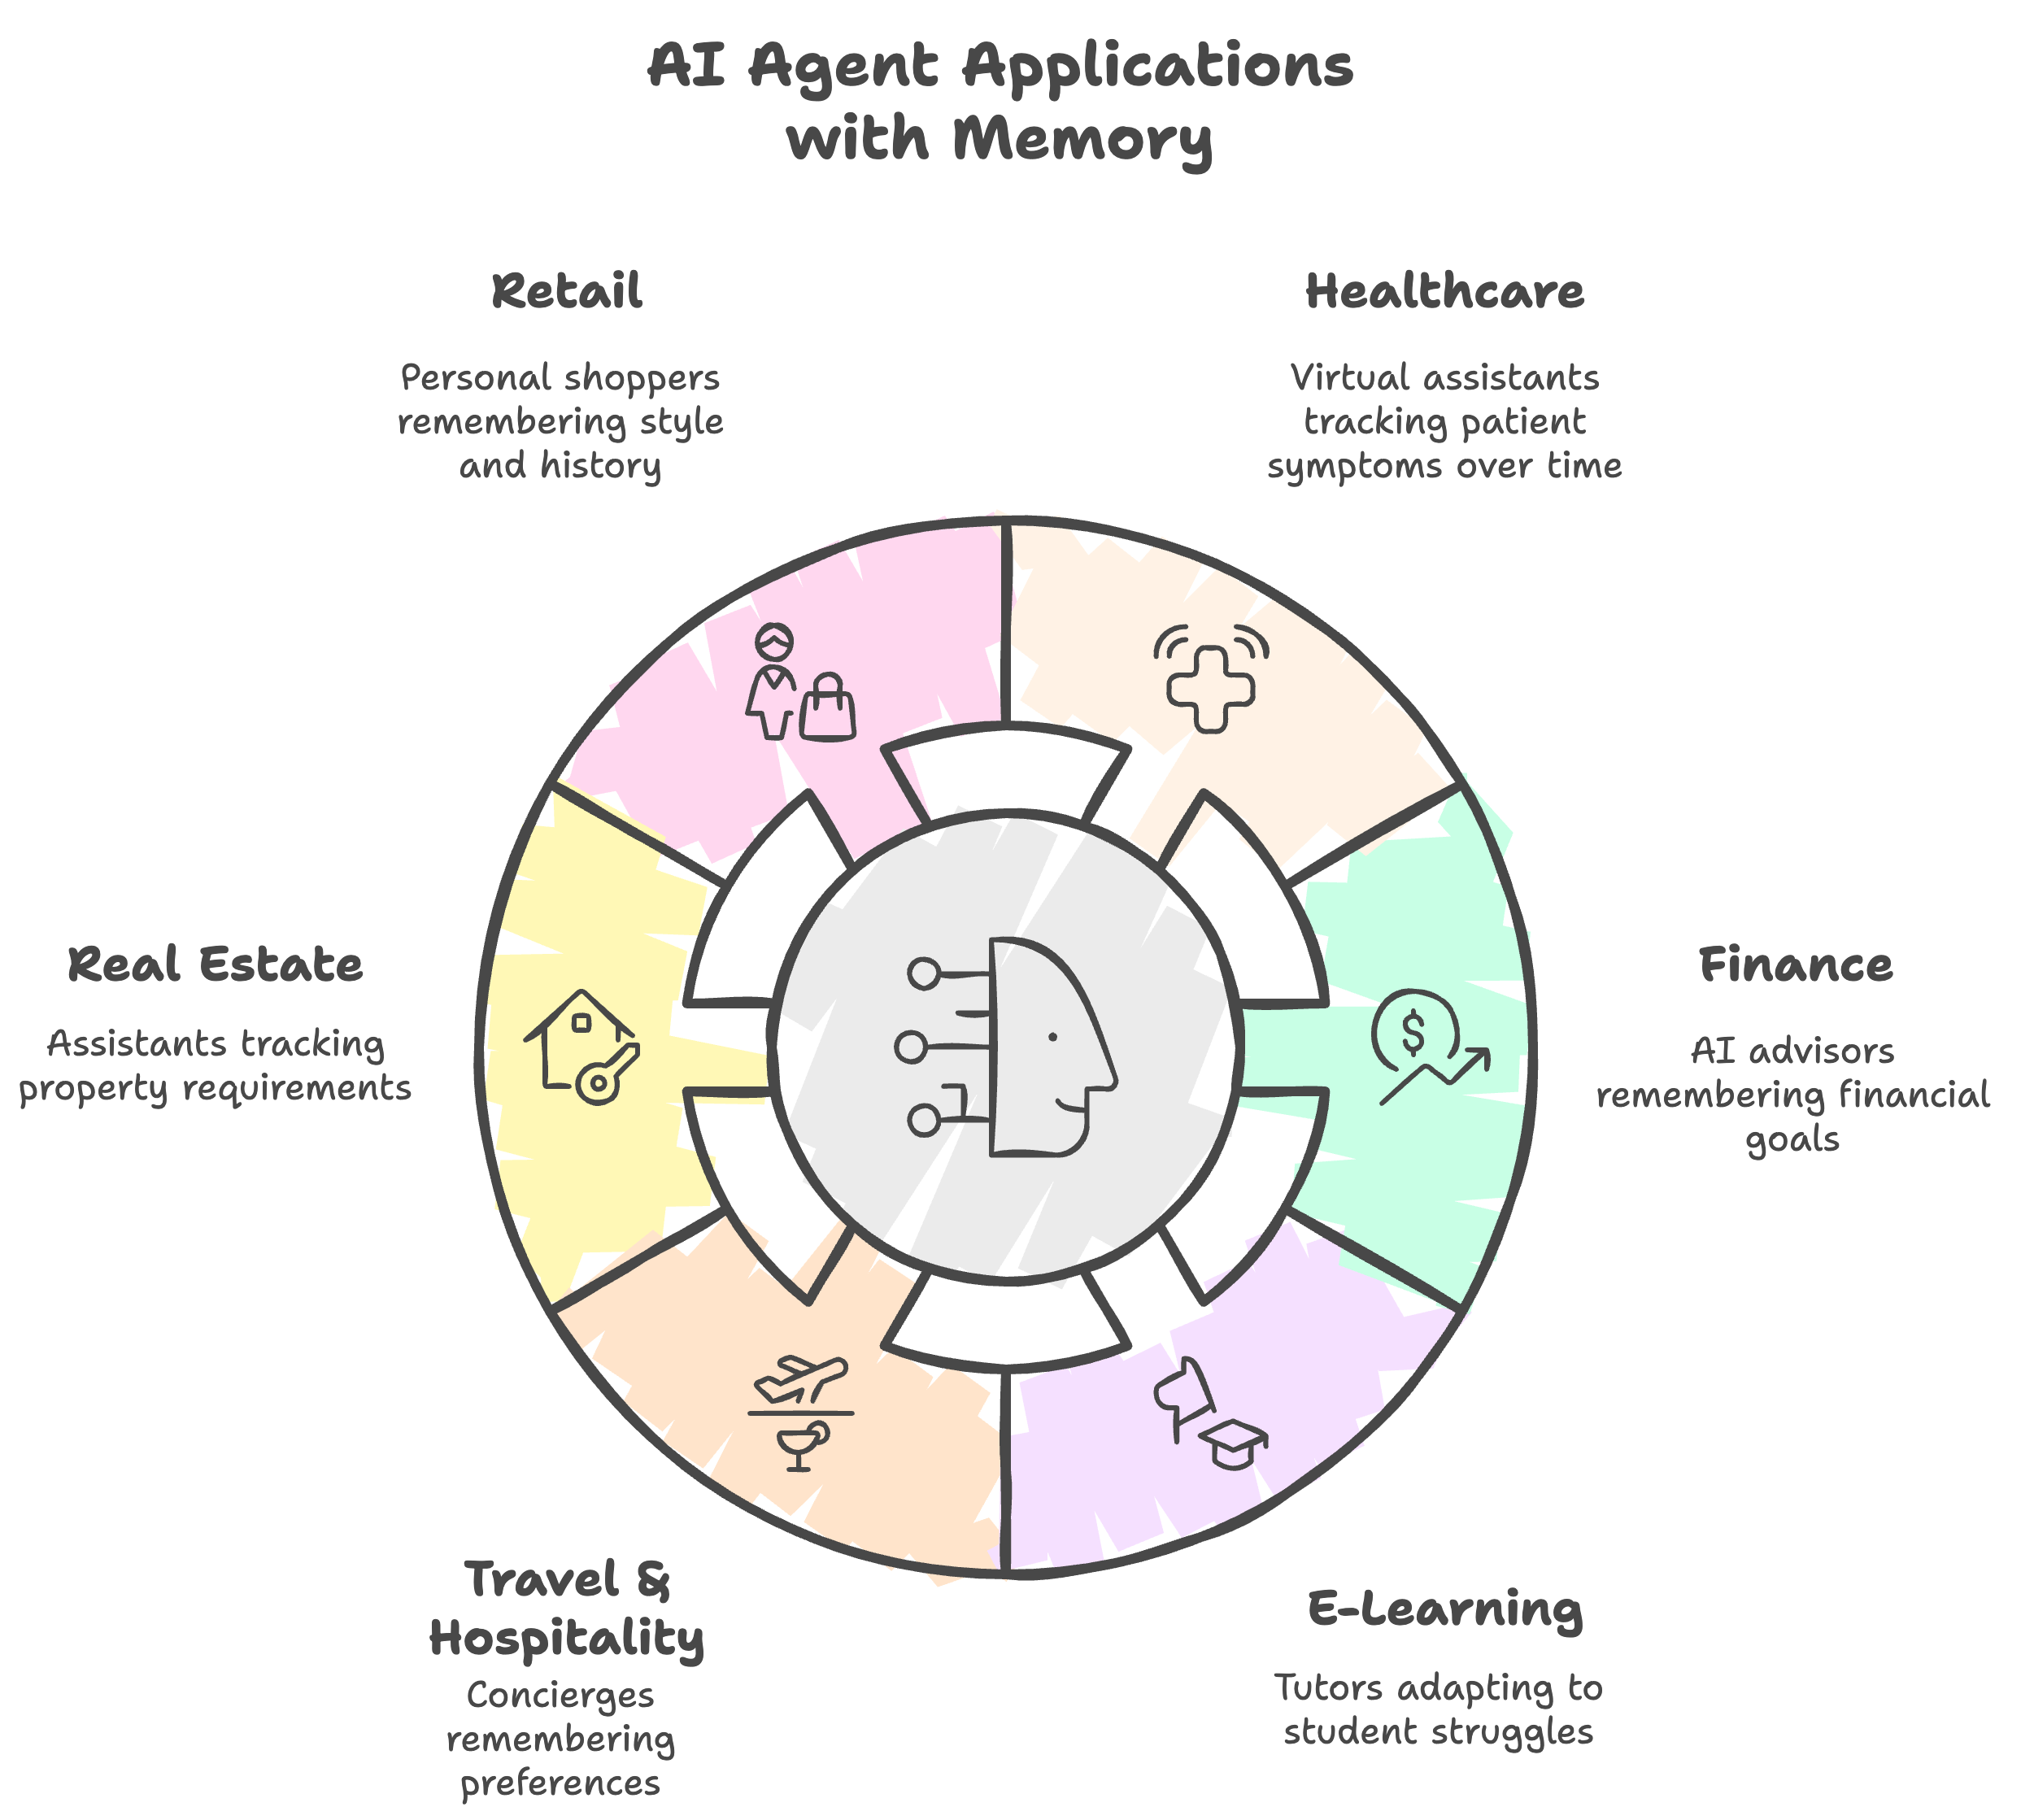
不只是客服
這套代理(agent)+記憶架構,適用於任何需要連續性與個人化、面向消費者的情境:
- 醫療: 虛擬助理長期追蹤病患症狀(減少 70% 的重複提問)
- 金融: AI 顧問記住財務目標並主動提供指引(產品採用率提高 50%)
- 線上學習: 家教依學生的卡關情況調整(完課率提升 40%)
- 旅遊與餐旅: 禮賓服務記住偏好(回頭訂房率提高 35%)
- 不動產: 助理追蹤物件需求(成交速度加快 45%)
- 零售: 個人購物助理記住風格與購買歷史(轉換率提高 3 倍)
只要關係的連續性很重要,記憶就能創造可衡量的價值。
常見問題與快速修正
問題 1:測試聊天時出現 500 錯誤
徵狀: Widget 或 API 回傳「Failed to send message: 500」錯誤
常見原因:
- DigitalOcean 代理(agent)的存取金鑰無效或已過期
- 代理(agent)尚未完全部署完成
- 代理(agent)出現暫時性問題
解決方法:
要重新整理代理(agent)的存取金鑰,你可以使用以下腳本:
# Step 1: Create the refresh script (if not already created)
cat > refresh_agent_key.py << 'EOF'
"""Script to refresh the agent access key"""
import asyncio
import asyncpg
import os
from dotenv import load_dotenv
from digitalocean_client import DigitalOceanGradientClient

load_dotenv()

async def refresh_agent_key():
    conn = await asyncpg.connect(
        host=os.getenv("POSTGRES_HOST", "localhost"),
        port=int(os.getenv("POSTGRES_PORT", 5432)),
        user=os.getenv("POSTGRES_USER", "do_user"),
        password=os.getenv("POSTGRES_PASSWORD", "do_user_password"),
        database=os.getenv("POSTGRES_DB", "customer_support"),
    )

    try:
        agent = await conn.fetchrow("SELECT * FROM agents LIMIT 1")
        if not agent:
            print("No agent found")
            return

        agent_uuid = agent["agent_uuid"]
        website_key = agent["website_key"]

        client = DigitalOceanGradientClient()
        access_key_response = await client.create_agent_access_key(
            agent_uuid=agent_uuid,
            key_name=f"key-{website_key}-refresh"
        )

        new_key = access_key_response.get("secret_key")
        if new_key:
            await conn.execute(
                "UPDATE agents SET agent_access_key = $1 WHERE agent_uuid = $2",
                new_key, agent_uuid
            )
            print(f"✓ New access key created (length: {len(new_key)})")
            print("✓ Database updated")
        else:
            print(f"✗ Failed to get key: {access_key_response}")
    finally:
        await conn.close()

if __name__ == "__main__":
    asyncio.run(refresh_agent_key())
EOF

# Step 2: Run the refresh script
docker cp refresh_agent_key.py customer_support_api:/app/
docker exec customer_support_api python refresh_agent_key.py

# Step 3: Restart the API
docker-compose restart api
bash
重新啟動後,等待 10-20 秒再重試你的請求。
問題 2:記憶無法跨工作階段保留
徵狀: 使用者回訪時,AI 不記得先前的對話
常見原因:
- 請求中未提供
user_id - 不同工作階段使用了不同的
user_id - 未設定 Memori API 金鑰
解決方法:
# Correct: Always include the same user_id
curl -X POST http://localhost:8000/ask \
  -H "Content-Type: application/json" \
  -H "X-Domain-ID: $DOMAIN_ID" \
  -d '{
    "session_id": "your-session-id",
    "user_id": "user_alice_123",  # ← Same user_id every time
    "question": "Your question here"
  }'

# Wrong: Omitting user_id
# This will work but won't have cross-session memory
bash
檢查你的 Memori API 金鑰:
# Verify MEMORI_API_KEY is set in .env
grep MEMORI_API_KEY .env

# Should show: MEMORI_API_KEY=mk_...
bash
問題 3:代理(agent)部署卡住
徵狀: 過了 5 分鐘以上,代理(agent)狀態仍停在「STATUS_WAITING_FOR_DEPLOYMENT」
解決方法:
# Check agent status
curl -X GET "http://localhost:8000/agents" | jq

# If stuck, check DigitalOcean logs
docker-compose logs api | grep -i "deployment\|agent"

# Force refresh by restarting the API
docker-compose restart api
bash
如果問題仍未解決,代理(agent)可能部署失敗了。請檢查你的 DigitalOcean 儀表板,或聯絡技術支援。
問題 4:Widget 無法載入
徵狀: Widget 沒有出現在網頁上
常見原因:
- widget 設定中的
domainId不正確 - 瀏覽器無法存取 API
- CORS 問題
解決方法:
// 1. Verify domainId is correct (from Step 3)
console.log('Domain ID:', 'YOUR_DOMAIN_ID_HERE');

// 2. Check if API is accessible
fetch('http://localhost:8000/health')
  .then((r) => r.json())
  .then((d) => console.log('API Health:', d))
  .catch((e) => console.error('API Error:', e));

// 3. Check browser console for errors
// Press F12 → Console tab
javascript
問題 5:知識庫上傳失敗
徵狀: 檔案上傳回傳錯誤,或知識庫未掛接到代理(agent)
解決方法:
# Check supported file types
curl -X GET http://localhost:8000/knowledge/supported-types | jq

# Verify file size (should be < 10MB for most cases)
ls -lh /path/to/your/file.pdf

# Check if knowledge base was created
curl -X GET http://localhost:8000/knowledge-bases | jq

# If KB exists but not attached, wait 2 minutes for background task
# The system attaches KBs after agent deployment completes
bash
常見問答
1. 對話記憶壓縮如何降低 token 成本?
對話記憶壓縮的運作方式,是把冗長的對話歷史轉換成精簡的摘要。Memori 不會送出 20 組訊息往返(可能超過 2,000 個 token),而是送出像「User Alice, order #12345, inquired about delivery」這樣壓縮後的摘要(大約 20 個 token)。這能減少 40-60% 的 token 用量,同時為你的客服 AI 保留上下文。
2. 除了 Llama-3.2-3B-Instruct,我還能用其他 AI 模型嗎?
可以。你可以使用 DigitalOcean Gradient™ AI Console 中任何可用的模型。在你的 .env 檔案中,把 DIGITALOCEAN_AI_MODEL_ID 更新成你選定模型的 ID 即可。不同模型在效能特性、成本與回應時間上各有差異。
3. 跨工作階段的對話記憶是怎麼運作的?
跨工作階段的對話記憶仰賴 user_id 這個參數。當你在不同工作階段之間提供相同的 user_id 時,Memori 會取出先前對話的壓縮摘要,並把它們納入上下文。這讓你的客服 AI 能記住數天或數週前的資訊,而不必儲存完整的對話歷史。
4. 這套架構適合上線使用嗎?
適合。這套架構包含:
- 兼顧安全與隱私的多租戶隔離
- 用於可靠資料持久化的 PostgreSQL
- 便於部署的 Docker 容器化
- 符合 GDPR 合規的各網域代理(agent)隔離
- 錯誤處理與疑難排解能力
正式上線時,你會想加上監控、速率限制,並部署到雲端基礎設施。關於正式環境的最佳實務,請參考我們的 Docker 部署指南。
5. 如果 Memori API 金鑰過期了會怎樣?
如果你的 Memori API 金鑰過期或失效,記憶取回會失敗,但聊天功能仍會照常運作,只是沒有記憶。你會在 API 記錄中看到錯誤。要修正這個問題,請在 .env 檔案中更新 MEMORI_API_KEY,然後重新啟動服務。
6. 我要如何為高流量做擴展?
面對高流量,可以考慮:
- 使用像 DigitalOcean Managed Databases 這樣的代管 PostgreSQL 資料庫
- 把 FastAPI 後端部署到 DigitalOcean App Platform 或搭配負載平衡的 Droplets
- 為經常存取的記憶實作快取
- 為資料庫連線使用連線池(connection pooling)
- 加入速率限制以防止濫用
結語
跟著這篇教學,你已經用 DigitalOcean Gradient™ AI、FastAPI、PostgreSQL 與 Memori SDK,建置出一套穩健、可上線、具備持久對話記憶的客服 AI 代理(agent)。你完成的系統不只是回答問題——它能跨工作階段記住客戶的互動,讓對話更自然,並把 token 成本最多減少 60%。
在這份指南中,你:
- 建置並部署了一套端到端的 AI 客服系統,可用 FastAPI 與 PostgreSQL 依你的業務量身打造。
- 整合了進階的對話記憶,為使用者提供情境感知的協助,改善解決時間與客戶滿意度。
- 啟用了多租戶、安全的部署模式,讓你的架構適用於橫跨多個網域的 SaaS 情境,同時兼顧隱私。
- 為真實世界的可擴展性與可靠性打下基礎,善用 Docker、DigitalOcean 基礎設施與記憶高效的設計。
這種對話記憶模式不只適用於客服——它在醫療、金融科技、旅遊與教育等產業都是經過驗證的做法,只要連續性與個人化能改善成果的地方,都用得上。
想更進一步嗎?試著把你的代理(agent)連接到你的領域知識、CRM 或工單系統,並持續監控真實的使用者對話,這樣你就能長期反覆迭代與優化。想了解進階與即時的 AI 代理(agent)模式——包括 serverless 工作流程與水平擴展——請參考我們的教學:building real-time AI agents with Gradient and serverless functions。
下一步
-
加入特定領域的知識
- 上傳你的 FAQ 文件、產品手冊、政策文件
- 針對你的特定使用情境訓練代理(agent)
-
自訂對話流程
- 修改後端的系統提示(system prompt)
- 加入轉真人(escalation)觸發的商業邏輯
-
監控與優化
- 追蹤 token 用量與成本
- 分析對話模式以尋求改善
- 對不同的問候訊息做 A/B 測試
-
為正式上線做擴展
- 部署到 DigitalOcean App Platform 或搭配負載平衡的 Droplets
- 建立監控與告警
- 實作速率限制與安全措施
- 考慮為 PostgreSQL 採用 DigitalOcean Managed Databases
-
與既有系統整合
- 連接 CRM 以取得客戶資料
- 整合工單系統以進行轉真人
- 加入分析儀表板以取得洞察
準備好繼續打造了嗎?延續你的旅程,用 DigitalOcean Gradient™ AI Platform 順暢地部署、擴展與管理你的智慧應用。